Attention2

Showing posts with label Crochet. Show all posts

Wednesday, 26 July 2017

Donation Hats


This Winter I have been busily crocheting hats/beanies as donations to the local thrift shops, hoping they will help some families keep their kids warm.

Here are some of the hats/beanies that I have crocheted for the donation box mainly using up leftover yarn from previous projects.  

There are plenty of free patterns on the internet that you can download or watch on YouTube.  They only take a hour or so to complete.  Great for working on during the evening whilst watching TV.  


If you can crochet even just the basic stitches you could make one of these.  And believe me once you have made one, you won't stop there. 

Here is a link to a video I created for the Crochet Ribbed Beanie.

https://www.youtube.com/watch?v=G47JafiR0go

Very easy to work.

So why don't give it a try....


'Spring Surprise' baby afghan


I have been working on a fabulous baby afghan called 'Spring Surprise' from a book named Circular Baby Afghans by Rebecca Leigh.  

This is intended for special Spring baby.

Loving the pattern.

Finally finished this 'Spring Surprise' baby afghan for a special baby due in October. Very pleased with it.  This is the first time I have followed a written pattern such as this.  Obviously had to concentrate.  I ripped back a couple of rows on the way, but it was so worth it.  The book I have had in my cupboard for more than a few years.  I assume it is still available.  But it is well worth seeking it out.  There are some great patterns in it.  All are circular.


A Hat With Love

 
Tried this pattern out after watching a video by Bobwilson123 called Made With Love. Far easier that I thought. You can find the free pattern and tutorial at: http://www.myhobbyiscrochet.com/…/a-hat-with-love-free-croc…

 I found this to be an easy pattern to follow.  I have only followed a graph pattern a couple of times before and found this to be easy.  But, I might add that is best to read all the instructions and work your way through the pattern in your head before starting it. Familiarise yourself with the graph.  I really hope you give it a try.

Wednesday, 16 March 2016


 MILE A MINUTE 
  crochet baby blanket


This is such an easy project to make.  Honestly sooo simple.  There are many variations of pattern on the internet. You can make this to any size you want.  These two blankets were approx 30" square for a crib sized blanket.  Having two colours to compliment each other really makes it stand out.  The lemon and white was just the two colours, but the lilac variegated and white really made it pop.  It is an ideal project to work on whilst watching tv or traveling.

 
Materials:
DK/8ply yarn
200grams white
100grams contrasting colour
4mm crochet hook
Shell pattern: 3dc, 2ch, 3dc

  1. With the white yarn ch 9
  2. Into 6th ch work the shell stitch (dc 3, 2 ch, dc3) ch 3. Skip 2 ch and into last remaining ch slip st to join up. 3 ch and turn your work so that you are working into the bottom chains (upside down)
  3. Work a shell stitch (dc 3, 2 ch, dc3). 1 dc into 3rd ch.  Ch3, turn your work.
  4. Repeat the shell pattern for 45 rows or (as many rows as you require for you blanket). 
  5. To give the strip a border in the contrasting colour join at a convenient place and ch3.  Work in dc all around the strip working extra dc's at the points of the strip.


When you have worked 10 strips with the contrast yarn or (as many as you require for your project) Join the strips with the white yarn in a sc join.  Here are two video clips that will demonstrate firstly a  flat single crochet join and then one that I used for preference.


(link to)
 BUBBLE POP crochet stitch blanket
(with single crochet join my way)

When all strips are joined as one piece work a dc border around all four sides working multiple dc's at the corners and points.  This gives the blanket a lovely finish.

Enjoy!

yours in stitches....


Monday, 29 February 2016

BUBBLE POP crochet stitch

Baby Blanket


This crochet stitch is a variation of the Crunch Stitch.  It produces an effect very similar to the Puff Stitch, Bobble Stitch, Popcorn Stitch, Raspberry Stitch, but is much simpler to produce.  Sooo easy!

The stitches you need to know are the chain st (ch), single crochet (sc) and treble (tr).  Every other stitch in one row is a single crochet (sc) followed by a treble (tr) stitch, and every other row is in single crochets (sc).

Lets get started.
Use any thickness of yarn and hook size to match the weight: depending on the project you have in mind.

Work a chain in multiples of two.

  1. Into the first chain work 1 single crochet (sc).  Then work the rest of the chain length in single crochets (sc).  (This produces a sturdy baseline to work on). Chain 1 (ch1) and turn your work.
  2. *Single crochet (sc) into the first stitch. One treble (tr) into the next stitch*.  Repeat the stitch sequence ** to the end of the row ending with 1sc into the last stitch.  1ch and turn your work.
  3. Work sc's into all of the stitches to the end of the row.
  4. Rows 2 & 3 form the pattern and are to be repeated to the length of the project you desire.
  5. When you reach the length of work you desire finish off with row 3 (sc). This will balance out with the beginning row.  With the sc stiches at the beginning and end of each row you will have a good base to work a border around if so desired.
Notes:
As you work the treble stitches alongside the single crochet stitches a small 'Bubble' will form to the back of the work.  This is correct.  By ensuring you work a single crochet stitch at the beginning and end of each row your bubbles will lie on top of one and other creating a very uniform pattern. Reminds me of bubble wrap.  You just want to pop them!

My blanket is for a crib size.  I have used DK yarn and 4.00mm hook.  I chained 34 resulting in 16 bubbles in the bubble row and I worked 15 bubble rows plus ended with a sc row.  I worked a contrasting border of sc.  Working 3 sc into the corners. My blanket consists of 12 eight inch squares before adding the border. Once all joined a final sc border in contrasting yarn.

I joined the squares using a single crochet method that I reconfigured to what I prefer.  I prefer my joins to be central and remain upright.  The method demonstrated in the 2nd link is a flat sc join, and tends to lean to one side.  In the 1st link I have demonstrated my version of SC joining which I much prefer.  It adds dimension and ensures the ridge formed lies central and not to one side.  I will put links to both methods below. 

I hope this post will help those that are a little challenged with the regular Bobble/Puff stitch.  This method is so much easier and fast to work up.  I hope you have fun with it.

BUBBLE POP crochet stitch video link
If you just want to view the Dimensional SC Join then fast forward the video to 5.05 mins.


by Web's America's Yarn Store


Thursday, 10 September 2015

Crochet Eight Petal Coaster


Crochet Eight Petal Coaster
These make great coasters.  Use a coarser choice of yarn. When completed stiffen with a 50/50 mix of crafting paste and water. Soak, squeeze out the excess and block it into shape. Let it dry naturally. Super easy.  Super effective.  Makes a great gift.  Crochet six and gift wrap.  Great for using up left over yarn.  
Materials: 

DK/8ply yarn
Size 4.50m hook
Scissors
Darning needle

Instructions:

Ch 6
Slip st to join the ring
Ch 3 (counts as 1dc), 15 dc into the ring. A total of 15 dc's + 3ch.
Ch up 4, dc into next st. (1dc, 1ch, 1dc) into the next 7 sts.
8 loops in all.
Slip st into top of 3 ch.
Slip st into next loop, ch 3, 5 dc into same loop. 
*(sl st in-between the two dc's. 6 dc into the next loop)*. Rep patt * to * until you have 8 petals.

Sew in your ends securely. Cut your threads.

Makes a very pretty coaster to adorn any coffee table.

Video demonstration:    Crochet Eight Petal Coaster


Wednesday, 15 July 2015

NECK WARMER in crochet

NECK WARMER

Crochet
DK/8 ply
Hook size: 4.00mm


Notes:
Sc sts are worked into the back loops only thus producing a stretch rib effect.  This creates air pockets to hold in the warmth.  Use a yarn suitable to be worn close to the skin.  Soft and cosy.

Instructions:
1.  Ch 2, 3 sc into the 2nd ch.  Ch 1, turn work.

Increase Row:
2.  1 sc into the 1st st, sc to the end.  Ch 1., turn work.  In this manner keep increasing 1 st at the beginning of each row until 20 sc.  1 ch, turn work.

3.  Work 1 row sc (no increase).

Decrease Row:
4.  Sc into 2nd sc and until the end of the row (decreasing 1 st).  Continue decreasing in this manner until 10 sts remain.

5.  Work straight for 8 rows.

6.  Follow the increase row until 20 sts are reached.

7.  Work straight for a further 70 rows (or to length req)

8.  Follow the decrease row until 10 sts remain.

9.  Work straight for 8 rows.

10.  Follow the increase row until there are 20 sts.

11.  Follow the decrease row until there are 2 sts left.  Cast off.

Loop Band:
1.  Attach your yarn to one  back ridge side of the 10 sc sts.  Pick up and sc along 10 back ridges.

2.  Sc a further 10 rows.

3.  Slip st into the other end of the 10 rows you attached to, thus creating a loop for passing the other end of your neck warmer through.  Sew in the end of yarn.

Your neck warmer is complete.  
Pass one end through the loop and Voila!

Tuesday, 23 June 2015

Baby Crochet Textured Coat


What I love about this pattern is the whole design.  It is well written and easy to follow.  I like patterns that work down from the neck as this one does.  This stitch pattern doesn't have a name.  I refer to it as a Puff Shell stitch.

The Puff Shell stitch pattern give the impression of a waffle type design.  This is particularly good for baby patterns to create warmth pockets to hold in the heat.

This Puff Shell pattern looks just as good on the reverse side, making this suitable for many projects like hats, scarves, cowls, baby blankets, afghans etc.  This definitely a go-to pattern of choice.

To the right is the one that I am working on at present and am absolutely delighted with it.  As soon as I pick it up I think of babies.  It feels and looks so right.  The yarn I am using is Robin Double Knit.  An 8ply/DK, and the hook size 4.00mm. 

As you can see the 'waffle' type Puff Shell stitch stands proud giving an awesome look.

Here is a close up of the stitch pattern on the reverse side, and as you can see it is just as good as the right side.  This is such an easy stitch to achieve.  I know you will love it.

This is just one of the many crochet patterns available for download at JustCrochet.  Patterns designed by Heather.

For a video link of the Shell stitch being worked go to:


This Baby Crochet Textured Coat Pattern is available to print off for free at:


Monday, 3 November 2014

Crochet Bobble Hat

Just had to share this with you all.  I recently completed this project.  I had seen this pattern on Ravelry.com and instantly took a liking to it.  Just had to try out the pattern.  And seeing's as I had enough leftover yarn from something else to use I went ahead.  And I thought it looked stunning even if I say so myself.

I found the pattern by Viktoria Gogolak to be well written and easy to follow.  You do need to know how to do a 'Puff stitch', though clearly explained in the notes.  Otherwise using stitches of single crochet, double crochet, slip stitch and chain stitch was all that was needed. 


I found making the 'Pom Poms' the most tiresome thing to complete at the end.


Think I will invest in a 'Pom Pom' making tool.  I did mine the way I used to make them back at school.  Two cardboard circles.  Fiddly.

So my friends, to find this pattern go to www.ravelry.com and search for 'Ella Hat Crochet Pattern'. It is a pay for pattern.  But well worth it!


Ok, til the next time byeee!


If you found this post interesting please 'Share' with your friends and fellow crafters.


 Imagez 

from photo to pendant engraving

for personalised photo engraved dog-tags/pendants
get your orders in early for Christmas!


Thursday, 23 October 2014

Crochet Baby's Jacket & Hat

Crochet Baby's Jacket & Hat
crocheted in one piece

There is something special about crocheting or knitting up baby clothes.  They are so quick to make up and look so cute!  I came across this free pattern by Cathy Wood. It is described as a one piece wonder because it is crocheted in one piece. From front to sleeve to back to sleeve to front.

Then I came across an excellent video on YouTube by Bob Wilson 123: 
Cat's One-Piece-Wonder crochet baby jacket
who goes through the pattern slowly, step by step.  This makes the pattern more user friendly once you have seen it demonstrated. 

The stitches used are chain st, sc, hdc & dc which are all worked into the back loop of each st giving a rib effect and some stretch-ability to the finished garment.

The sizing suggests 0-3 months.  Of course this depends on the size of a new-born.  I used approx 125 grams of yarn.


Link to free pattern:
https://drive.google.com/file/d/0B-sPkpHisGodd0g2VC1MUGFPQW8/view?usp=sharing    

There wasn't a hat pattern to go with this design, so I designed one to go with the jacket.  It does have a Half Shell edging to it, but it could be left off if for a boy.

Link to free hat pattern:
Crochet DC Rib Baby Hat


Friday, 17 October 2014

BABY COCOON AND HAT

Today I have a beautiful crochet pattern for a baby cocoon with a hat to match.  I have been dying to make one for ages.  I have hunted around for a pattern that I could follow.  But I find some patterns just don't work out for me as written, and I get very frustrated.  But when I go through the pattern word for word I realise certain bits have been missed out or written incorrectly and I end up re-writing it in a manner that I can understand. 

So my hat goes up to those who do write these as I have found it isn't as easy as one thinks.  I love the chevron crochet pattern and wanted to have it in my project.  I love colour and wanted a bold coloured pattern.  I like to see babies in colour instead of pale pinks and blues.  We are sold bright coloured toys to stimulate babies, along with bedroom accessories, prams, pushchairs etc, so why not garments? 

This pattern I have written I hope is fool-proof.  I keep going over it to make sure it is user friendly and correct.  But, I welcome any feedback on it.  It is my first and certainly won't be my last.  I have created this cocoon and hat in a DK yarn of three different colour choices.  I have to point out that the darker the yarn the thicker it felt.  The white felt considerably thinner, though it was of the same brand. So you may find your finished project different in size.  So be aware of that. 

Measurements given are only a guideline to follow.  And the sizing is for a newborn, but as you know newborns come in different sizes too.  So take this into consideration. The baby doll I used for the photos is of a preemie sized baby, and the cocoon and hat are a little large for it.  So make some allowances for the size you want to make.  To make it larger use a larger hook, or increase your stitches making sure the repeat pattern is accounted for; and increase your final amount of rows. I hope you have fun creating this pattern.


Download Link:  Baby Cocoon and Hat


If you found this post interesting and informational please
 'Like, Share or become a Follower 

          'Knowledge is for Sharing and Crafting is for Everyone'!

Sunday, 28 September 2014

Monster High Beanie

Hello everyone! 

I just had to update you on the crochet Brain Waves beanie pattern that I used for my interpretation of a Monster High Beanie.  I have been looking around for some 'Scull' buttons.  A reader referred me to 'Buttons By Benji' who has some really cool handmade buttons!

She is on Face Book:
https://www.facebook.com/pages/Buttons-by-Benji/430073687129432

Her blog is: http://www.buttonsbybenji.blogspot.co.nz/

Do drop by her pages.  You will be amazed at the variety and quality of her hand-made buttons.  From her I purchased my buttons named 'Bones' in her catalogue.  The delivery service was super quick.  So many thanks Nicci!

And a big thank-you to Mara Andrews for the referral.


My original pattern I used named 'Brain Waves' was a free pattern by

McQueen from Playin' Hooky Designs


The crochet flower pattern I used was by Yolanda:
https://www.youtube.com/watch?v=U8fgGFfyH8A


If you found this post interesting please Subscribe, Like & Share with friends, family and your Circles.  Comments are most welcome. 
Thank you ......

 Make Your Own Decals

Wednesday, 17 September 2014

Unique Crochet Stitch Baby Jacket

I just had to share this pattern with you crocheters out there.  I was looking for a baby jacket to crochet for a friend's new baby daughter and I went searching on YouTube.  I was looking for something different to what I have done before, and came across this video by Yolanda.  Though not her original pattern.  
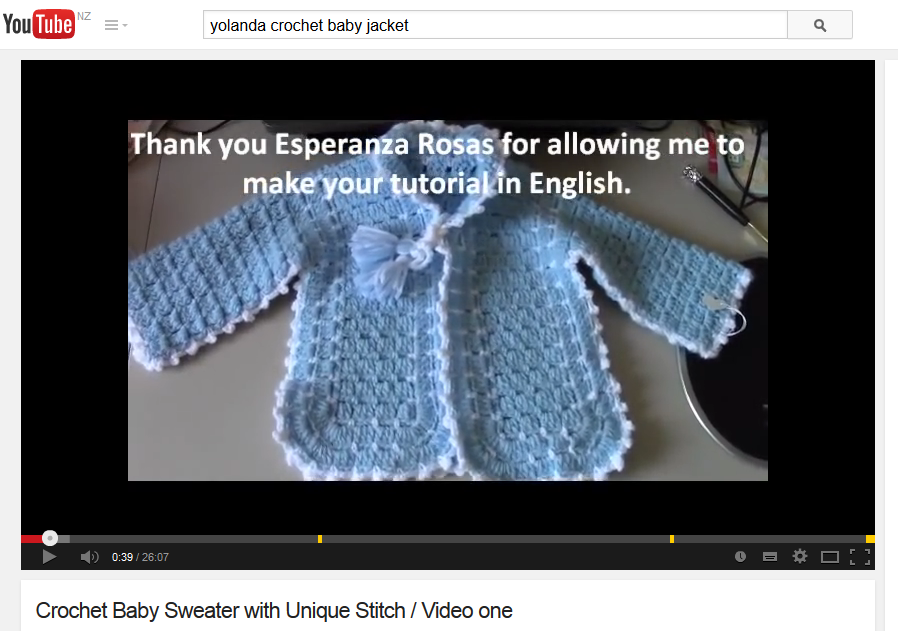
It was written by someone else but in a different language.  Yolanda sought permission to translate it into English and has done a great job.  I think you will agree with me how cute it looks.  And above all it is sooooo easy to do.  No kidding.  It must be the easiest stitch and pattern to follow.  You have to try it to believe me.  

If you look closely the joining up is done on the good side with a simple picot stitch all around the edges.  The only thing I have done differently is to sew buttons on the front instead of ribbon.  Just a personal choice.  I urge you to look into her different videos.  There are many.  You will come across a hat/bonnet to go with the jacket.  I will be crocheting it soon as time permits.


Unique Crochet Stitch Baby Jacket
 If you like this posting please like, share by clicking on the buttons below.  

 ------- Let's Keep Crafting Alive! --------

Monday, 15 September 2014

Entrelac Crochet Blanket

Hi everyone!  It's a Tuesday again and would you believe it, it is raining in Auckland again!  I am honestly over it.  Just want to see some sunshine now with a bit of warmth to it.  So what is my post about today?  

Well as I was rummaging about in my craft cupboard amongst the UFO's (unfinished objects), and I came across a baby blanket in Entrelac Crochet.  If you don't know what that is, it is a version of Tunisian crochet.   simply picking up stitches and crocheting them off. 
 
I started this one a couple of years ago and haven't got around to finishing it.  If I go away it normally goes with me and a bit more will get done.  I love the colours, and if I knew of a baby boy being born I would forge ahead and complete it.  But, it seems only baby girls in my circle of friends.

Anyway I thought you might like to see the YouTube video that I followed to create this. It is by Bethintx1, who is Beth from Texas.  She does a great easy to follow tutorial.  It is in several parts so you need to stay focused. 


Entrelac Crochet Blanket
Please click on link above.

Tuesday, 9 September 2014

Crochet Brain Waves Beanie

Brain Waves Beanie:

At the moment I am into crocheting beanie patterns to try out different stitches.  They are a good size to complete within an afternoon.  I came across this pattern that I just had to try.  I thought it would be a challenge; and it was to begin with.
My grand-daughter in Australia had asked me to crochet a beanie for her.  Being nine years old and right into Monster High dolls and their colours I had to find some appropriate yarn, and I think I have.  Now to look for some scull buttons to put somewhere on it?  Need to think about that one.
I had to follow the pattern carefully instead of going off on my own tangent.  Anyone else do that too?  But I  feel have mastered it now.  Best make her sister one too.


This is not my pattern! This is a free pattern written by:
Liz McQueen from Playin' Hooky Designs